Sunday, December 13, 2015

May Your Cup

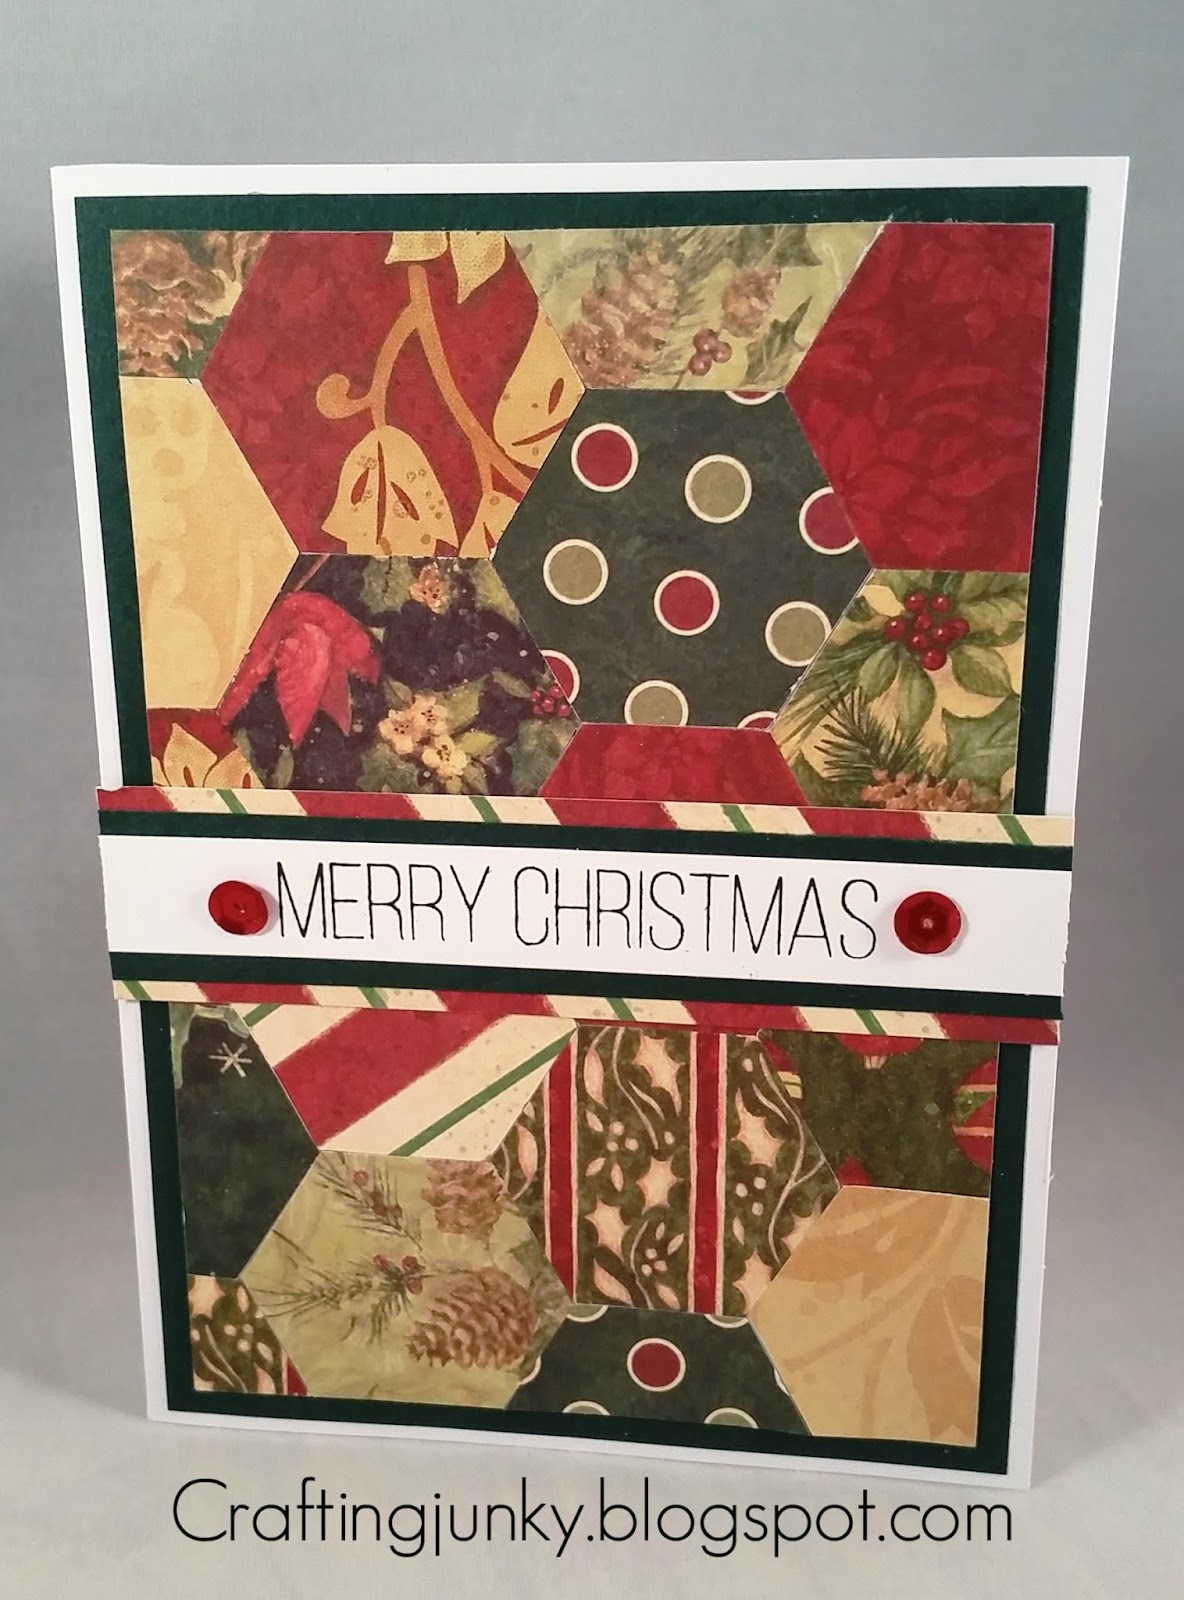
Today's card was created in honor of National Cocoa Day. I was so bummed out during the Fall Coffee Lovers Blog Hop that I wasn't able to use the free digi file that Verve generously provided for the hop because my printer was out of commission at the time. My printer is up and running now so I knew I wanted to use the great little cocoa mugs from this hop's free digi found here for the Holiday Coffee Lovers Bloghop. I colored them using Copic markers and fussy cut them out. I layered on some of the gorgeous papers from the American Crafts Hot Cocoa 6x6 paper pad. I added a bit of red and white braiding ric rac that I found in the dollar bin this morning at Target. I cut one of the sentiments from the digital and cut a fishtail banner out of it. I mounted it up onto some foam squares from Scrapbook Adhesives and placed it near the top of the card. I popped the cocoa mugs up with the same foam squares and added some clear Wink of Stella to them and the sentiment for some added shine and glimmer. A few bright red sequins I picked up at my local dollar store complete the card. I plan on sending this out to a very crafty friend for Christmas. 


Saturday, December 12, 2015

Merry Coffee Wishes

Today's card was created for the Holiday Coffee Lovers Bloghop. I recently picked up a few Unity Stamps on sale during Black Friday and just had to use one of them to create a fun holiday coffee card that I plan on sending to a crafty friend. I started by stamping the darling image from Hello Love onto some 110 lb cardstock from Staples and colored the skin and hair using Copic markers. I then stamped all of the clothing onto patterned papers from My Mind's Eye's The Merry Days of Christmas 6x6 paper pad and paper pieced them onto the image, shading them with Copic markers. I die cut the focal panel using a My Favorite Things pierced oval die and added some black dashed lines with a Memento tuxedo black dual tip marker to really make it pop. I layered some more patterned papers from the same MME paper pack to create my layered card base, popped the main image up using some Stampin' UP foam dimensionals, and added more dashed lines to add more interest. I stamped the Merry and Wishes from Amy R Big Christmas Wishes using Versamark onyx black and cut them out into little panels. I die cut the Coffee sentiment from Verve Stamps coffee die using more patterned paper and popped it up using foam dimensionals. To finish the card off I added a few red sequins that I picked up at my local dollar store and some clear Wink of Stella glitter pen all over the image and the lettering. I hope you like it!


Thursday, December 10, 2015

The Twelve Days of Christmas

For my second card I chose to use a new stamp set that I'd received as blog candy from SugarPea Designs called The Twelve Days of Christmas. It's actually supposed to be a companion stamp set to an image set they sell but I don't own those so I decided to let these adorable circle stamps take center stage. I started with a white card base and layered some super sparkly iridescent glitter paper from The Paper Studio cut to the same size as my card. I layered on a panel of forest green, also from The Paper Studio and then stamped my images in Versamark clear ink. I sprinkled on some silver detail embossing powder from Recollections and hit it with my heat tool. Once cool I popped that panel up using some foam tape for dimension and added some silver lawn trimmings from Lawn Fawn. I added some dots of glitter around the circles using my frosted lace Stickles and sprinkled on a few red metallic sequins that I picked up at my dollar store. I will be entering this card in Eclectic Ellapu December Challenge. The theme is the twelve days  of Christmas. 


Merry Christmas

My poor blog has been so neglected lately! The holidays are always a busy time for people but when you work in the medical industry it's extremely busy this time of year. Work has been so crazy lately that I've not had much time for anything else. But I stayed up late last night and worked on a few cards that I wanted to share. As soon as I saw this sweet stamp from Unity Stamp Company I knew I had to have it and I managed to snag it during a big Black Friday sale so even better, right? I stamped out the truck image from the Old Traditions stamp set in Memento tuxedo black ink onto some 110 lb cardstock from Staples. I colored the image in using my Copic markers and then stamped the greeting from the same stamp set below using Versafine onyx black ink for a nice crisp impression. I cut the image out using a pierced oval die from My Favorite Things and put some foam dimensionals from Stampin' UP on it to pop it up. My card base is some bright red cardstock from Paper Studio and I layered a small strip of plaid patterned paper from the American Crafts Noel 6x6 paper pad. I took a strip of forest green cardstock from Paper Studio and embossed it using a snowflake embossing folder from The Paper Studio. I will be entering this CAS card in the Male Room Challenge and CASology weekly challenge. I hope you like it!


Wednesday, December 2, 2015

Some Of My Best Friends Are Flakes


My second card today was created for the Virginia's View Challenge all about glitter, the Time Out Challenge to use a snowflake, and The Paper Players tic-tac-toe challenge. I started by added some cherry red cardstock onto a white card base. I cut a smaller panel and embossed it with a snowflake embossing folder by The Paper Studio and layered it onto my card. I die cut some patterned paper from the American crafts Jolly 6x6 paper pad using a pierced circle die from My Favorite Things. I popped it up using some Stampin' UP foam dimensionals and added it to the center of my card. I cut apart one of the panels of a small cocktail napkin that my husband brought home for me. I wish I knew who made it but try as I might my search for it online came up a bust. Anyway, I cut one of the panels out and mounted it onto some cardstock for stability and then I added a nice scalloped, decorative border using a punch by EK Success. Once the napkin panel was adhered I popped it up off of the card using more foam dimensionals and added some nice bling with some Christmas red and Frosted Lace Stickles onto the snowman, some clear Wink of Stella glitter pend around the outer edges of the cardstock, and some shimmery and iridescent sequins that I picked up at my local dollar store. I think it turned out so adorable!


Friday, November 27, 2015

Ho Ho Ho

My second card today was created for The Challenge. The challenge was to make a Christmas card using the inspiration photo. I loved the the Ho Ho Ho sentiment and wanted that to be the focus of my card. I found a wonderful card sometime back on Pinterest and saved it to my board but had forgotten about it until today. I wanted to replicate it but with my own twist. I started by embossing the sentiment from the My Favorite Things Grand Holiday Greetings using Versamark ink and heat embossed it onto some black cardstock using Recollections snow white detail embossing powder. I love the contrast of the crisp white against the black. I adhered that to my red cardstock and layered that onto my white card base. I punched a white border using the Stampin' UP dotted scallop ribbon border punch and punched the buttons for Santa's jacket using black cardstock and an EK Success 1/4" circle punch. Using my Nestibilities large scalloped circled dies I die cut the collar and adhered that onto the card and called this card done! Pretty simple and easy to replicate. I have to make several of these this year!


Merry Christmas

Today's card was created for the Jingle Belles Holiday Leftover challenge. The challenge is to use leftover scraps of paper, an image or stamp you've never used, or little bits of embellishment you have lying around. One of my favorite leftover techniques is to use a punch to use up those little bits of paper from my 6x6 paper pads that you can really use to create anything else. For my card today I used a Fiskars hexagon paper punch and took all the leftover scraps from an old K&Company Susan Winget Christmas paper pack. It's a beautiful paper pack filled with gorgeous images in traditional Christmas colors but those little snippets leftover are really tough to use for things like paper piecing since they have larger images on them. The hex punch really gives me a nice way to use those hard to use scraps up and to create something pretty out something that might have been thrown away! Creating this card was easy. I simply started with a white card base and layered on some inexpensive evergreen cardstock from Hobby Lobby as a focal layer. I punched my hex shapes out of my scraps of paper and layered them onto a piece of tying paper that I created a grid on to keep my pieces straight. Once done I added a strip of the patterned paper with some more of the green cardstock followed by some more white for my sentiment. I stamped my holiday greeting in Versafine onyx black ink and added a few matte red sequins I picked up at the Dollar Store and called this card done. Easy peasy and so pretty! 


Sunday, November 22, 2015

From Our Home To Yours

My card today was created for the 52 Christmas Card Throwdown Theme Challenge family and friends. I started with a plain white card base and layered on a few pieces of patterned paper from the American Crafts Hot Cocoa 6x6 paper pad. I just love these yummy papers and they just scream winter and holidays to me. I stamped the gingerbread couple from the Avocado Arts Gingerbread Goodness stamp set onto some plain kraft cardstock from The Paper Studio and fussy cut them out. I stamped the house from the same stamp set onto the patterned papers and fussy cut them out as well. I popped the roof and the gingerbread couple up off of the card using some Stampin' UP foam dimensionals. I stamped the sentiment from the stamp set and added some black dashed lines around the outer edges of the focal panel to give it some added detail. I added some candy red and frosted lace Stickles to the snow bank, the roof and chimney lines, to the gingerbread couple, and on either side of the sentiment for some sparkle and shine. I mean, what's a Christmas card without some sparkle and shine, right? I hope you like it!


Saturday, November 21, 2015

Season's Greetings


My second card today was created for the Merry Monday and Inkspirational Christmas card challenges. I have several deer stamps and dies and had a tough time deciding which ones to use. I decided I wanted to create a quiet, serene scene where deer would be found. I cracked out a stamp that I've owned for well over a year but I'm embarrassed to say I've never used. I wiped the dust off of my Hero Arts Winter Trees stamp and stamped it using some clear Versamark ink. I then did some masking and stamped only the deer on the Memory Box Deer In The Field stamp. I used the sentiment from the WPlus9 Pretty Patches stamp set. I heat embossed it all using Ranger liquid platinum embossing powder and seriously love the way it turned out! I popped the whole panel up onto a plain white card base using some foam tape and added a bit of DMC gold cross stitching floss. My only regret was that the floss started unraveling as I was tying the bow. I tried several pieces and all of them did the same thing. I finally gave up and adhered it down with a glue dot but am still not happy with that bow. I guess I'd better find some different twine or floss. But I am happy with the card overall and am sorry it took me so long to break out this beautiful stamp! 
  

The Most Wonderful Time Of The Year

Today's card was created for the Card Concept challenge. While I simply love everything about this photo I was most drawn to the red and white and the gingham. I didn't have any gingham paper but I had some pretty plaid that I wanted to use for this. I wanted to keep the design simple so I chose to basically keep the colors to red, black, and white while adding a bit of shimmer with gold touches. I started with a white card base and then layered on some black cardstock from Stampin' UP. I then added a layer of the plaid paper from Crafty Secrets. I die cut a small white panel using Gina Marie Designs dies and then stamped the tree sentiment from the Kaisercraft Basecoat Christmas stamp set using Versafine onyx black ink for a nice crisp impression. I popped the focal panel up using some foam tape, added a few onyx black sequins from Pretty Pink Posh and a few dots of gold metallic detailing using an American Crafts gold metallic pen. So simple and so pretty! I hope you enjoy!


Friday, November 20, 2015

Wishing You


Today's card was created for the CASology Cue Card and the CAS(e) This Sketch challenges. Now, I have to admit that I struggle with clean and simple. It's just not in my nature so I really have to constrain myself to not go overboard with embellishments or too much layering but I like the way this turned out. I started with some textured aqua cardstock and layered on some kraft and added some dashed lines using my Signo uni-ball white gel pen. I stamped one of the flowers from the Stampin' UP Flower Shop stamp set using Memento tuxedo black ink and punched it out using the coordinating punch. I colored the flowers using Copic markers in the blue and blue violet family to create a nice variegated look. I added a few white dots using my gel pen and then added some small white pearls from The Paper Studio. I heat embossed the Wishing You sentiment from the Verve Stamps Wishing You stamp set using clear Versamark ink and snow white detail embossing powder from Recollections. I added a pearl to the I in the sentiment to tie it in with the flowers. I popped the flowers up using some Stampin' UP foam dimensionals for a bit of dimension and called it done. I hope you like it! 

Thursday, November 19, 2015

Give Thanks

Today's card was created for the Curtain Call Inspiration Challenge. I was so excited when I saw this challenge because I had just ordered the Stampin' UP Thankful Forest Friends and knew it would be in just in time for the challenge. As soon as it arrived I inked it up and created this sweet little card. I started with a plain white card base and layered on a piece of kraft cardstock. I inked up the sentiment and the coordinating foliage using Gina K. charcoal  brown ink. I stamped the adorable little fox using Memento ink in peanut brittle, fussy cut it out, and popped it up off of the card using Stampin' UP foam dimensionals. Using my Signo Uni-ball white gel pen I added some white dotted detail to the foliage and some dashed lines around the border of the card for added interest. Love how sweet and simple this card is and I plan on inking up several more to mail out this Thanksgiving season.  Thank you for looking!

Saturday, November 7, 2015

Autumn Blessings

I adore Autumn! I love the cool, crisp air and the beautiful foliage! I love Thanksgiving and all of the warm comfort foods that come with it! I love warm fires in the evening and I especially love fall colors! I had happened upon a coffee digital set that Julee from Verve Stamps had made available during the Fall Coffee Lovers Blog Hop but I wasn't able to use it at the time because I had a faulty wire on my printer. I downloaded the free digis for later because 1. it was free and 2. it's coffee related and I love all things coffee and 3. it has a beautiful Autumn theme! Anyway, I am finally getting around to using them now that my printer has been repaired! I kept it simple by using some mustard and leaf green cardstocks from Hobby Lobby and some pretty leaf paper from The Paper Studio, also from Hobby Lobby. I die cut a large circle using MFT's pierced circle dies and then added some faux black stitches around the outside of the sentiment. I colored the mugs using Copic markers in shades to match the patterned paper and then fussy cut them out and mounted them up using some foam dimensionals from Stampin' UP. A few candy dots in yellow and orange from the Paper Studios and I called this card done! 

Merry Christmas

My third card today was created for the Curtain Call Inspiration Challenge. I found a fabulous plaid while reading through the Crafty Secret blog and knew I had to use it for this challenge. I printed the plaid print out onto some heavy weight ivory cardstock using my HP printer and then cut it down to fit my card base. I layered some white card stock onto the back of some black cardstock and centered the panel onto the plaid paper. I die cut the Merry Christmas sentiment using a Simon Says Stamp die and the snowflakes from a Paper Smooches Die set. I adhered them down to the card and added a few black buttons from my stash using glue dots from Stampin' UP. This was a pretty and easy card to make but love how it turned out. 


Noel

My second card today was created for both the Merry Monday Christmas Card and the Curtain Call Inspiration challenges. The inspiration for this card was a free digital plaid download from the Crafty Secrets blog. I printed it out using a 5x7 format to make the plaid a bit smaller and cut it down to smaller strip for this card, which left me a larger piece to use on another card. I added some gold stripes to the paper using an American Crafts metallic marker and then bordered the paper with some black Stampin' UP cardstock. I stamped two ornaments using the Hero Arts Ornaments #3 stamp set in Versamark ink and then heat embossed them using Ranger's Antiquities claret and liquid platinum and then die cut them using the coordinating dies. I backed them with the snowy background stamp from Papertrey Ink Winter Snow Globe stamp set and heat embossed that using Ranger's enchanted gold. I then stamped and die cut the tree and santa from the same stamp set and colored them using Copic markers. I added some yellow, red, and ice crystal Stickles to them for added sparkle and then mounted them to the ornaments. I punched a hole in the ornament tops using a regular hole punch and then threaded some black DMC embroidery floss through them to act as the strings and fastened them to the back of my panel using some tape. I added a little bow to each ornament using some Ranger Multi Matte Medium. I stamped the Noel sentiment using Versafine onyx black ink from the Gnome For The Holidays stamp set and then added a few sequins from Pretty Pink Posh and Simon Says Stamp. I hope you like it!


A Little Kindness Goes A Long Way

It's been almost a week since I posted a card. I think the holidays and winter are going to get the better of me until I get my vacation. But I did manage to create a few cards today and my first card is for both the Freshly Made Sketches #211 and the Colour Me Monochromatic color challenges. I kept this card in the neutral family of browns for the color challenge and tried to play off of the sketch. I started with some plain white cardstock and inked the edges going straight to paper with my Gina K charcoal brown ink. I mounted that to my card using some double sided tape since I had to dry it with my heat tool and it warped a bit. I then cut down a smaller panel and stamped the elements from the Stampin' UP Kinda Eclectic stamp set using warm cocoa ink and charcoal brown inks, both my Gina K. I then cut a small circle using MFT's pierced circles dies and inked the edges using the same charcoal brown ink. I cut an even smaller circle using a Spellbinders die and stamped one of the elements from the stamp set using the warm cocoa ink. I stamped the butterflies from the same stamp set using both inks and then fussy cut them out. I layered them up using foam dimensionals and glue dots from Stampin' UP. A few sequins from Pretty Pink Posh finished up this card!


Monday, November 2, 2015

A Very Pink Season's Greetings

It's been a while since I've had a chance to post a card. Life has gotten in the way...work, visiting relatives, and making time for friends I've not seen in a while. But when I saw this week's Time Out Challenge I knew I had to make time to participate in this one simply because I knew it would force me outside of my typical comfort zone for holiday card making. The challenge is to create a Christmas card with the optional twist to include pink and/or purple. I stopped and thought about it and I have to say that I don't think I've ever made a holiday card with either pink or purple on it so I thought it might be fun to try. I started with some patterned paper from My Mind's Eye. I apologize that I cannot recall the name of the paper but I only bought a single sheet of it years ago and had thrown the strip with the name of it away right after I bought it. But that pretty paper had all of the right colors in it to launch my focal panel. I decided to try my hand at watercoloring. That's something else that's very much outside of my comfort zone. I'm not very good at it and most of my efforts in the past have failed but I was determined to make this work. I started with a piece of Strathmore cold press watercolor paper and I cut it out using a Gina Marie Design stitched line die. I prepped the paper with a powder tool and stamped the adorable stocking image by Hero Arts using some Versafine onyx black ink and then heat embossed it using some American Crafts clear embossing powder. Using some Tim Holtz distress ink in Spun Sugar and did a nice wash of light pink over the entire background and then added some darker pink splatters using my Simply Art watercolor palette. I stamped the stockings again, embossed them, and then watercolored them using my Simply Art watercolors in pink, purple, and green. I fussy cut them out and popped them up off of the focal panel using some Stampin' UP foam dimensionals. I added some frosted lace Stickles over the stockings for some added sparkle and dimension and then added a few sequins from Pretty Pink Posh in the corners. I stamped the greeting from the Simon Says Stamp Be Joyful stamp set and heat embossed it. I cut the paper out and created a banner by creating fish tails on either end. I love how adorably this turned out and I hope you do too!


Tuesday, October 20, 2015

Have A Super Day

My final card today was created for the Less Is More masculine card challenge. I tell you...I love making masculine cards. They are so much fun for me! I started with a plain white card base and layered on some old grey patterned paper I'd picked up at Hobby Lobby and layered on some red cardstock and then some white. I stamped the city skyscape from Close To My Heart's super powers stamp set using some Colorbox charcoal grey ink. I used a Stampin' UP borders dotted line stamp to create the top border and then used to speech bubble from the CTMH stamp to create the sentiment which I stamped using Paper Trey Ink's petite alpha in the same grey ink. I stamped the super hero image in Memento tuxedo black ink and colored him to look like Superman using my Copic markers. I popped him up on some Stampin' UP foam dimensionals to sort of look like he was hovering above the city. I love this adorable stamp set! So fun and so versatile!

Hope Your Birthday's Epic

My third card today was created for the Less Is More masculine card challenge. I started with a digital stamp that I purchased online from an Etsy shop. I love this stamp because there are so many fun things you can do with it and since it's digital you can alter the size to fit any card need! I kept the coloring simple on the controller and just used a few primary Copic colors and a few greys to darken the knobs. I mounted the controller directly onto some distressed blue paper that I picked up from Hobby Lobby and added an orange postage stamp edge border to the top and bottom. Using the same orange cardstock I trimmed out the sentiment using a fishtail banner that I created using my scissors. I mounted the whole panel onto so dark navy cardstock and layered it all onto my kraft cardstock card base. I adhered a bit of Doodlebug black and white bakers twine using some Glossy Accents and this card was done. So stinking cute, right? 

Rock On

For my second card today I created another fun masculine card for the Less Is More masculine card challenge. This one could work for both teens and adults. I actually sent my son a very similar card to this a few years ago. I started with a plain white card base and layered on some distressed grey paper that I had picked up at Hobby Lobby. I took a lighter distressed grey paper and inked it up with the Unity Stamps Splatters and Stars stamp set in a Colorbox charcoal grey ink. I stamped and die cut the guitar from Paper Trey Ink's You Rock stamp set and used the coordinating die to cut it out. I stamped the sentiment onto the panel and popped the guitar up using Stampin' UP foam dimensionals. I stamped some lines using  Stampin' UP's old olive ink and the Colorbox charcoal grey ink and layered that at the bottom. A few dashed lines in black Memento tuxedo black ink using my dual tip marker wraps this card up. I hope you like it!

Happy Birthday

I was so excited when I saw the new challenge over at Less Is More because I love making masculine cards. I used to struggle so much but I'm lucky enough to have a husband who offers me amazing input and acts as my sounding board on my creative output. I put together a collection of cards that can work for both grown men as well as younger men and teens. My first one is just a simple layout that I found on Pinterest. Using some simple cardstock and patterned papers from Hobby Lobby I stamped out the motorcycle image from Deep Red Stamps using Versafine onyx black ink and layered the panels together, added a few white and black mini brads on either side and slapped it together. The sentiment is from a My Favorite Things stamp set. Love how simple but pulled together this card turned out. This one was so easy it could be mass produced. 


Thanks for stopping by!


Sunday, October 18, 2015

Witching You

Today's card was created for a friend for Halloween. She loves Halloween even more than I do and she adores witches. I found this image on Pinterest and decided to run with it. I think it has a very 1960's vintage feel, kind of like Samantha from Bewitched. I uploaded the image onto some 110 lb white cardstock and left the coloring alone. I liked it just the way it was. I cut the image down into a small rectangle and matted it onto some Stampin' UP black cardstock and trimmed it out so that it left a 1/4" border all around. I popped it up onto some Stampin' UP foam dimensionals and added some gorgeous papers from the We R Memory Keepers Bewitched 6x6 paper pad. I trimmed each panel out using the same black cardstock just to keep it consistent. I used my Stampin' UP modern label punch for the sentiment and then used just the ends in black to compliment it. I stamped the sentiment from the My Sentiments Exactly Halloween Innies & Outies using Versafine onyx black ink I added a few orange and black sequins from Pretty Pink Posh and that wrapped this card up nicely! I hope you like it!

Saturday, October 17, 2015

I Chews You

My second card today was created for the Addicted To Stamps And More anything goes challenge. I have been on something of a zombie kick lately. Not sure if it's Halloween coming up or if I'm finally getting some new Walking Dead episodes but I own three separate zombie stamp sets and I've been using them a lot lately. This stamp set is from Sugar Pea Designs and is beyond adorable. I chose to make a sweet Anniversary card out of this one. It could really be used for Valentine's Day, wedding card, etc. I inked my zombies up using Memento tuxedo black ink onto some 110 lb white cardstock and colored them in using Copic markers. I used a pierced edge circle die from MFT to cut the circle out and adhered it to my piece of patterned paper from the We R Memory Keepers Antique Chic 6x6 paper pad. I ran it through my Cuttlebug using a Paper Smooches stitched line die to add the lines around the panel and then adhered that to some Stampin' UP black cardstock and adhered the whole thing onto my cardbase. I stamped the sentiment from the same Sugar Pea Design stamp set and used a stitched fishtail die to cut out the sentiment. A few black hearts using a Paper Smooches die completes the card. Love how it turned out and I hope you do too!